Friday 27 April 2012

High Ho Silver Lining!

Good song :D
Anyway, got me doing some silvery silverness on my eyes today, and I think I have done a good enough job to be able to release it to you, the internet.
I went all out sparkles today, I got my face gems recently and bought me some eyelash glue to stick them on with because it is just as good as the glue that is "designed" for sticking gems on your face. So I used quite a few more products than ususal and I used a hell of a lot more glitter, I mean like wow amounts of glitter.
Anyway, my Boyfriends away for the weekend so I will actually get some regular posting done for this weekend ^_^ I hardly see him when he is at uni so I make the most of it darn it!
Here's the pile of glitter I used to colour myself in with: Urban Decay eyeshadow in Gunmetal, the coded palettes colours in Si1, Si2 and Bl2, Collection 2000 glam crystals eyeliner in hustle (#4) and rock chick (#7), Barry M kohl liner in 26 and 11, royal eyelash glue and the 300 4mm mixed colour round diamante loosegems from diamante crafts on amazon (as the batch is mixed colours, I seperated out the plain silver gems from the irricescent ones in the pack, be vigilant or you may end up looking silly with some of your gems silver and others a creamy colour stuck on your face!). The eyelash glue by the way will NOT stick them permanently to your face, you can pull them off just like you can when removing false eyelashes.
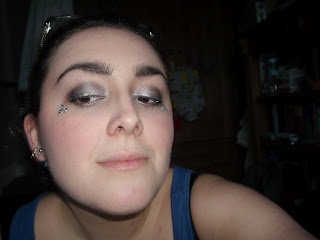
Trying to show off as much sparkle as I can here :) pretty sweet pose huh? Taking photos is hard when you have such short sight as mine and can't wear your glasses to take photos cause people won't see your makeup... :P
So how to...  Firstly apply Si1 to your eyelid, then use Si2 and apply it to the outer corner and blend it until it has blended half way into your eyelid, then with a slim brush, your little finger or and applictor sponge, lightly apply some Si2 into the crease of your eye. Then using the urban decay gunmetal shadow, shade the crease of the outer corner of your eye all round from your lashes into the crease up to where the silver has blended and is lighter. Now to eyeliner! Grab Barry M's liner in #11 and line your eyes top and bottom lid, over the lashes this time, NOT the tearline :). then use eyeliner #26 and line the upper outer corner of your eye only in the darker areas to keep the depth of colour there. NOw coat your lashes in mascara and while that dries dab a little eyelash glue onto the back of the gem and wait 20 seconds till it is tacky and carefully place it and the other gems in triads (that's groups of 3 for you guys unsure) about half a centimeter under your lower lashes and when that is done your lashes should be ready to be emblazoned with sparkle! Use the silver glitter to coat the lashes in the inner corner of your eye, then use the black glitter for the outer half, layer it up! it's not done till it looks as if you're staring through diamonds! Now the lash glue holding the gems should be dry, layer up some glitter in the centre of them to add even more sparkle and put some silver glitter on the inner corner of your eye too for good measure!

See! So much sparkle!
Ready to party? Oh yes!
:D
Anyway, enjoy yourself blinding the masses with your sparkling radiant glittery goodness my darlings!

Wednesday 25 April 2012

here comes the sun

I've not done anything wacky on my lips in a while, so in the spirit of being a crazy kinda gal, I gave myself a glowing go over with some bright citrus (it of course had nothing to do with the fact I just found some dandelion yellow eyeliner on sale... thanks to my rockin grandma for that treat :D) I coloured up my eyeboggles and my lips to match, lets check it ouut:
Not my favortie picture, I was much too close to the camera but it is the only full face I managed to get before I was practically booted out the door. Meh.
Any way, Got my groove on here, gonna tell you what I used while having a boogie to Jimi Hendrix!
Used: claire's accesories body crayons in yellow and orange from the rainbow set, sleek eyeliner in canary yellow, Barry M eyeliner in #24. I also used a small  brush, like the tiny ones used in model painting.
Just a heads up too, you may notice a difference in the consistency of the 2 eyeliners, the sleek one in much softer and glides more than the barry m eyeliner, but don't panic bunnies, I'll explain how to over come this in a jiffy.
I did my lips first so I'll tell you how to do them first, I started with the yellow body crayon, I drew a mid sized yellow circle in the center of my lips and went over it again to build colour depth. Then, following your lips shape, in the orange crayon, fill in where you haven't got yellow on your lips, don't worry if you slightly over lap the yellow at any point. Once you have done this, with your little finger, smudge the edges of the 2 colours together and touch up if the 2 colours look sparse after wards, then use the small brush to blend the colour further, by swirling the brush in a spiral up and down the area where the 2 colours have met.


Now for your eyes, first line half your upper eyelid, from the inner corner with the yellow eyeliner and then from the outer corner, line with the orange until they meet, the difference in textures means you CANNOT blend the two colours using the orange, it is too dense to do so, so use the yellow to blend the two colours, and when you have blended with the yellow as best you can, use the brush from your lips earlier, this will help also in blending them smoothly. When you have belnded, go back to the end of the orange, at the outer corner, and create a short sharp flick, if you can't do this neatly, go from the corner part of your tear line where the top and bottom tear line meet and flick upwards in a straight line from there and then connect the flick and the liner on your upper lid.

you can sort of see what I've done here... too blurry though for my liking.

Anyway, happy joy sparkly whatnot to you all
x

Monday 23 April 2012

Something metallic this way comes...

Thought I'd go back to some fancy eyeliner for this look, eyeshadow gets a bit samey after so long doing particular designs. Anyway here it is;
Pretty flash no? I was inspired by the alt fashion stars in a tattoo mag I picked up a while ago, she had some stunning eye make up on which I will attempt to imitate at some point.
Anyway here's what I used: Barry M kohl pencils in 1, 11 and 26 (black, grey and silver)
I think this look is quite rock :) would look great teamed up with some leather leggings and a sparkly black top :)


the how to bit:
you start with the silver, ad the outer corner of your eye, line the upper and lower lash about a third of the way in, then use the grey and line the center third starting from where you ended with the silver, blending the grey and the silver, using both pencils until you are satisfied with the quality of the blend, then with the final colour, black, line the final thrid starting from where the grey stopped and use the black and grey colours till you are happy with where they blend. Then make sure you smother your lashes in plenty of mascara being careful not to get it on your liner, if you do, just go over it in the colour it has smudged. If you like, use some of the black glitter (collection 2000 rock chick) on your lashes to gove some extra oomph :)

tada :D

Happy lash fluttering to you all :D

Sunday 22 April 2012

Bronzing

Look smiley xD
Don't be fooled I have lips lol, I just thought seeing as how I have such dark makeup on my eyes, I should mute my lips, so I used some new stuff I bought specially for you. The blog as Im sure you can tell is still having teething problems in terms of me getting this shiz out on time :P
Anyway, I bring to you bronze!
the close ups are not so hot, but you gotta admit I'm getting more photogenic?
Here's what I used:
Eyes; Barry M kohl liner number 1, shadows R1, R2 and Br7, collection 2000 glitter gel liner in 7 rock chick
Lips; collection 2000 craeam puff moisturising lip cream


How to... On your eyes it's a simple set of 3 washes of colour, first cover your lid in R1, then lightly go over that in R2, then apply Br7 half way into your lid from the outer corner of your eye. Line your upper and lower tearline in the black eyeliner. Then coat your lashes in lashings if mascara till they are nice and thick, wear falsies if you want even more oomph! Then cover your lashes in the glittr liner.
Your lips are also pretty simple, the lip cream goes on matte and looks better than if you use concealer to mute your lips... muuuuch better because the cream doesn't crack like concealer and doesn't leave your lips dry, which is great for smooching. So simply use the applicator or your fingers to cover your lips in the creamy lip cream and pucker up ;)

I'm shortly going to be psoting up some trans (drag) looks up soon, a friend of mine agreed to be a male model for guys who want to see what looks would be like on them and for those who like wearing make up to grab some inspiration, we are after all a varied world so I stand by the fact I'm going to have a varied blog.

Wednesday 18 April 2012

Seeing Red

Mhmmm here we go, ladies, gents, micellaneous, my final reverse rainbow colour doo... exciting, after this I'm offski concentrating on new stuff, gonna maybe get my metallic on? Do me more jungle mojo and I have ordered some body gems so more sparkle is on the way :D
The pictures won't be as bright as they ususally are, I miss laid my camera down stairs and had to use my webcam instead with lack lustre results, cé la vie. Anyway, for you to get a look this lusty use: Barry M kohl liner in 25 and colours R3, R5 and P7. I haven't done anything to my lips for this, red is hard to pair a colour with, but if you must must wear something on your lips, simply apply something pale, reeeeally pale, like clear lipgloss, or even better, tinted lipsil in a pinky/red colour.
The how to section:
Firstly cover your eyelid in P7, then use R5 from your outer corner, blending into your eye so half your lid is now a darker red, then use R3 on the inner corner, like eyeliner, and thickly line with an applicator, cotton bud or with a brush then line your upper lid with the eyeliner in a thin line and flick it up at the end, if you can't do flicks well, follow the edge of your eyeshadow, it should make it easier. :)

There is no zoom on my cam, so I did my best :P
Anyway, have fun y'all till tomorrow.

Tuesday 17 April 2012

Citrus Fresh :D

Look how happy I am :) I get to wear some lippy on this one too :D You probably can't see it on this picture though :P it's not the right angle to pick up the shine of my gloss WHICH I BOUGHT TODAY SPECIALLY FOR THIS :D
OK, here is your list of ingredients for todays look: Barry M kohl liner number 24, Palette colours O4, O5 and O2, Barry M glossy tube number 9 and collection 2000 glam crystals in funk 3.
And this is how to:
Firstly, you load up your brush/finger/applicator with O5 and cover your eyelid with it, then use O2  to shade from the outer corner of your eyelid, to half way in, blending this further towards the inner corner. Then use O4 to contour, shade the crease of your eyelid and blend in a circles to blur the edges. Next, using the eyeliner, start away from the eye, placing the liner on the edge of where your eyeshadow is and create a pointy flick, going towards your eye, and line 2 thirds into your eyelid and taper this down into the lashes, thicken the point if desired. Where you haven't got orange eyeliner on your upper lid, (the last third) use the glitter eyeliner and curve this round the tear duct part of your eye, but don't take it into the lashes. Now use lashings of your favorite mascara on your lashes and when they are dry coat your top lashes with glittery eyeliner :D Sparkle sparkle.
Now for your lips, make sure they are flake free and clean, if they are a bit rough, use a toothbrush to smooth them out and apply a layer of gloss to upper and lower lips, blot the gloss on some tissue to remove excess, then apply again to create a sheer corally glow on your lips, also, this gloss smells amazing :D

Lovely Jubbly xx

Monday 16 April 2012

2 for the price of 1

By way of apology for my lack of posts the past 2 days, I am posting up two looks tonight, the yellow and the green looks that I was meant to have done by now. Here ya go...
This is the green look. I of course added glitter to this one, it's an excellent party look, greens in this fresh colour look best for a party or nice evening, if you want it to be a daytime look, just don't use the glitter or delicately pat it onto your eyelashes when your mascara is wet. For the look I used 2true eyeliner in number 4 (metallic green), snazaroo glitter gel in blue, and eyeshadows from the light in the box 120 palette Gr5, Gr10 and Gr13. (You'll find the coded palette in the blog before the last)
The how to bit..
Firstly use the colour Gr5 to create a base on your eyelid, just wash it over your entire lid. then use Gr10 to shade in a third of your lid starting from the outside and blending when you're a third way into your lid. Then use Gr13 to contour your eye, blend the darker green into the crease so it is softened by the base green but still nice and shimmery.
After you've completed your eyeshadow, thinly line your upper and lower lid with the green eyeliner and give it a flick at the end, following the edge of the green shadow. Then layer on your mascara and dab the glitter gel under your lower lashes down to just above your cheekbone, be sparing with the glitter! I used the end of a brush to dab it on so I didn't get too much glitter on my face or you look like a disco ball :D.
Hokey Kokey :D on wards and so forth to our second look of the night...
YELLOW :D
A very sparkly look this one :) to get this look I used collection 2000 glam crystals gel liner in funk 3, Barry M kohl pencil in number 1, and colours Y3 and Y2 I also used a claire's accesories body crayon in Yellow from the rainbow set.
How toooo:
Firstly wash all over your lid with Y3, it a sheer yellowy colour and then shade the outer third of your lid with Y2 and blend. Then use the body crayon to line your eyes, shapen it to a fine point for this because it is a chunky pencil. Theeen, over the yellow crayon, slick on some gold glittery liner to calm the brightness of the line and add gorgeous glitter to the look. Don't use the glitter on your lower lid though, instead, once you have coated your lashes to your liking with your fave mascara, just lightly layer some of the gold eyeliner onto your mascara as it dries. Then with the khol, line a third of your lower tear line and a third of your upper tear line to define the outer eye.


Saturday 14 April 2012

Um...

No green tonight chicks :P I had a date :D a rare and wonderful thing x) my boyfriend is sat here saying I'm cruel for saying so :P I disagree I think we should go places like cinemas more often. Anyway, it's his fault there is no post tonight, we haven't been back long and I'm too tired from watching a great big movie screen to do anything for you, I'm sorry :(
Loves and hugs
Oh, by the way we went to see that "Pirates adventures with scientists" it is rather chucklesome, so see it if you don't mind things like Wallace and Gromit.

Friday 13 April 2012

CODED PALETTE

Feeling blue

Not really... just blued up my eyes here :)
Marching onward with the reverse rainbow of looks I'm doing, and we are onto blue. Blue can sometimes be garish (think that crazy lady you sometimes see with shocking blue eyeshadow on and bright pink lips trying to recapture her youth using all the wrong method... she may eve be wearing some lycra in one form or other) so I've gone somewhat subtle to avoid lookng like I was dragged through the 80's backwards by a screaming washed up pop star sporting big bad hair. ;)
It's very pale under the flash, but if I don't put a flash on everything is kinda orange :/ what can ya do eh?
AAAAnyhoo, I'm gonna be posting up that picture where I have coded the colours on my palette so you can acurately recreate looks, so I'll be using the codes on this post, pay attention :)
For this look, I used my 120 colour palette, in blues shades:B1 and B5 I also used Barry M eyeliner number 19.
How to...
Sweep the pale blue eyeshadow (B1) over your lid making sure you get iinto your inner corners. The use B5 (dark blue) like an eyeliner and shade over the top lashes of the outer corner of your eye a third of the way into your lid. Then use the eyeliner to line the top lid lightly and half of your lower lid under the lashes.
Like I say, it's not a complex one this, you don't want to over do blue, it's just not good. It's one of my least favorite colours to use on myself :P
lol I look cross eyed here, I was too busy trying to aoid the flash to look cute ;)
Thar we go.

Thursday 12 April 2012

P..p...p..purple :)

Heehee... oki doki, here we go again, more colour themed fun for y'all reading this :D
I'm continuing on with the theme "my cousins party make-up experiments" going backwards through the spectrum of colours, now we hit purple, tomorrow blue, the day after green... and then... the world... or maybe yellow, orange and red... maybe.
AAAAAnyhoo, here we go.
It's a tad darker than yesterdays offering, and with the dark eyeliner having been used all around the eye it looked a little vampy too, so kinda sexy :) I used my palette again, and indulged by using some shimmers rather than matte this time, I used the light purple found on the first of the 2 palettes when you open the case, and the darker purple on the second of the 2 palettes I'll upload suitable pictures at some point with a code on so I can more acurately show you what colours I am using, because this description is not helping you really :(. I lined my eyes with Avons supershock gel liner in blackberry. I did nothing to my lips, but if you want to put something on your lips, make it sheer, or colourless because it will look WAAAAY too much if you put colour on your lips, what with the depth of the ourple on your eyes. I recommmend a clear shiny gloss or something with gold or silver shimmer in it :)
How to...
Sweep the pale purple onto your lids, all over your lids smoothly. Then on the outer corner of yur eye smudge on the darker puple and blend till you are satisfied the two colours are infused around the middle of your eyelid. Then delicately line around your eyes in the purple, don't make the line thick or you'll over power the look.
TADA :D I'm still hunting for someone to propose a challenge for me :)
Till tomorrow mon amour.

Wednesday 11 April 2012

Something simple: Think Pink

Hello :D today I am thinking piiink. You see my little cousin is having a prom type dance at the end of her last year of junior school before she leaves all her little friends as they drift into different high schools. She has asked me to do her make up for it so I have graciously taken time out to do so... I am now experimenting with looks and colours for her outfit. I'm not sure what colour it is yet so I am going to do ALL the colours. In backwards order of the rainbow :)
To work:
Ok... I got my big eyeshadow set today and I used that for my shadows from light in the box (120 set) I used the matte white, matte pastle pink and matte barbie pink (I don't know how to show you on the pallet... I have pictures but once again the flash has muted most of the colours:[ ) Also used Barry M pink eyeliner (number 23) and pinked up my lips with benefits posie tint lip and cheek stain with a coat of Barry M's irridescent pink glossy tube (gt2 pale strawberry shimmer).
Eyes:
For this i washed my lids with the matte pastle pink making sure to get into the edges as it gives some umf to the colours I blend over the top, then I used the matte white in the inner corner of my eye, and the barbie pink on the outer corner, blending into the center of the eye. After that, get the pink eyeliner, and starting from just past the middle of your eye, draw a semi thick line, flicking it out into a short neat point past the end of your outer corner of your eye. Then line your lower tear line in the pink.
Lips:
Make sure they are NOT CHAPPED or flaky, if they are, grab your tooth brush or a rough towel and just scrub away the dead skin, then apply one coat of the lip tint to your clean dry lips. Blot it with tissue and apply a thin coat of the lip gloss, and blot that, then grab your most trusted lipbalm and layer some of that on, it picks up the irridesense and adds a nice additional sheen.

There's the palette and a very fluffy me :)


Friday 6 April 2012

Peacock eyes...

Apologies for the shoddy camera work, only the flash ruined the colours which are much more intense in life than on pixle. AAAAny way, here's how I did it for you lot to do for yourselves :)
I figure this is pretty for a night out or if you fancied something original for a carnival or for fun.
First things first, equipment:
I recommend using brushes, I had to make do with cotton buds because mine have fallen to bits after much abuse. your colours are : Dark blue, turquoise/light blue, gold and leafy green. I also used a turquoise glitter (le freak 5 by collection 2000)
Start by dampening your brush and swirling it in the dark blue and in the center of your lid drawing a fat c shape with the dark blue. Clean your brush or grab a new one, and dampen it and coat it in the turquoise (or light blue, which ever you use) and fill in around the c shape to a small circle that doesn't quite fill your lid. New brush, or clean the old one, dampen it and swish it in the gold and draw a small arc around the edge of the turquoise/ light blue. Next, another new bruh or clean the old one, make it damp again and run it in the green colour and make a very thin line around the edge of the gold. That is the basics done. Because it's me though, I added glitter :D and after giving my eyelashes a go over with some mascara, I coated them in sparkly glitter and lined my lower lid with it too :D
I look tired don't I... I've had a long day for give me.

Thursday 5 April 2012

Mucho Apologies :(

Oooh, I am so sorry I'd not posted yesterday :( It was a tad hectic and I hadn't brought my enormous stack of make up to my grandparents and to top it off my laptop cut off due to lack of power :(
I won't have a tutorial tonight either because I have hayfever and my eyes itch like you wouldn't believe so I'm dosed up on antihistamine and writing a heartfelt sorry to you.
I'm waiting for a 120 eyeshadows set to come from China, I ordered it a while back and it's taking ages to get here, when it does I promise something magic as compensation for my neglect. My cousins Evie and Katie have also devised a list for me to complete (the girls are not even teens yet and think this blog is super cool ^_^ love them) so I said I would, if you think I look crazy on any tutorial I'll blame them ;)
Thank you for being patient with me, we'll call this teething problems with it being my first blog :)

Tuesday 3 April 2012

Mahahahaha I have procured a willing victim :D

Teehee... My good buddy Shivani has permitted me to use her a guineapig... erm... I mean model to fashion some styles on. She has beautiful Asian skin, she comes from India, so I can practise some looks specifically for other ethnicities on this page :) I'm quite the mongrel myself being from all over Europe (Italy, Ireland, Scotland and Germany). She originally wanted me to just show her a pretty, simple everyday look for when she's out and about that sums up no hassel. I said fine, but can I video the make over as a tutorial for my blog. She said fiine, so long as it doesn't end up on youtube... deal.
Anyhoo, onto business, todays look:
ZEBRA LIIIIPS
Simple you think... mmm no.
I used a sharpened white Claire's Accessories body crayon from the black and white shades pack and the black no#1 khol pencil.
Hee hee, well a how to. Firstly, google... it helps visualise a zebra pattern on your lips if you can see one infront of you, so find a zebra print :) then using black khol, trace a zebras pattern on your lip, and variety, make some lines span your full lips, other keep to either the top or bottom lip, and some middly ones, that only span the middle of your lips, not touching the top or bottom. Fill in the gaps with the white crayon CAREFULLY so you don't smudge up your black and turn your lips grey cause that's not the point of this look. And that's the tricky bit... not smudging it because you put the black lines on first.

When you are done, if you want to preserve it for a long time-ish, lipcote your lips for longer lasting zerba-ness.
Enjoy Chickens.
I do appolgise for my appauling face at the moment, I feel a bit crap cause of the rain today :(

Monday 2 April 2012

RAAAINBOOOOW

First blog... check it yeeeah :D
I was pootling my way around the internet as you do, memeing my brains out cause I loove meme's and I saw the sheer amount of rainbow in many of them... so I thought to myself "Why not rainbow?"
And so I did, and now I will disclose to you my rainbow wisdom and delight you by transferring digitally my rainbow onto your face like SLAP.
For your eyes:
I used several Barry M eyeliners (numbers 25, 24, 20, 19, 18, 23 and 1) and an Avon "supershock gel liner" in blackberry and a Claire's accessories body art crayon (yellow) from the rainbow set of 6.
Start nice and simple, from the inside of your upper lid, begin with the red eyeliner and trace a short line of colour, about the width of your middle finger nail, make it as thick as you like. Then the orange eyeliner, do similar, only making sure the beginning of your orange line slightly overlaps the end of the red and blend either with the eyeliner pencil, a cotton bud or your finger.  Now the yellow body crayon, if it's brand new, don't sharpen it, just delicately do the same as you did with the orange, overlapping the start of the yellow line with the end of the orange line; the yellow crayon is slightly greasy in its formula, so if it turns orangy with blending, don't worry, mine did, it still looks rocking, but if you do mind, wipe the tip of the cyaron and from the end of the yellow line work towards the orange until it's more yellowy. Now green, you may be coming to the end of your eye, don't flick the liner!!! Keep going with the edge of the eye like you see on my picture, blending the beginning of the green line with the end of the yellow line. now blue, same again now you should by now be on the lower lid, working under the lashes careful not to jab yourself in the eye ;) Again, blend the beginning of your blue line with the end of your green line... Purple is different, I found the Barry M didn't give me the purpley depth I wanted so I lightly dabbed the Avon super shock gel liner in blackberry and blended that over the purple.... PINK... same as the other colours... you now should have your rainbow repeat on your other eye. Use the black kohl to create a frame for you rainbow to make it pop! Do this by smoothing the black onto your tear line on your upper and lower lashes (the tearline is the inside bit under the lashes closest to your eye, if you blink when you do this, my tip is to look the other way from your eyeliners position, crazy tip, but it works and no, if you are careful you won't poke yourself in the eye, if you are still unsure don't do it) now mascara!!! Any mascara you like, personal choice. OK?
Lips:
This i used Rimmel "exaggeratee full colour lip liner" in 024 (red diva) and the Clarie's accessories body art crayons rainbow pack (6 colours), also a collection 2000 gel liner "glam crystals" in funk3... I don't know if you get Clarie's accessories in America or Canada (If any Americans or Canadians are reading this blog) if you don't Yellow eyeliner if you can lay your hands on it will work fine, I hear Stargazers cosmetics does a yellow liner?


Anyway... start in either corner of your lips, (I started in my left hand corner) and line about half a centimeter before your cupids bow in red and fill in that small area, both upper and lower lid. Now the orange crayon, similar protion of lip, colour it in orange and bland the edge between the red and orange. Now yellow, this should fall roughly on your cupids bow area of your lip, fill in a similar protion of your lip and blend yellow to orange, now green crayon, you'll be roughly on your right hand section of lip, if space is getting tight improvise ;) you may need to use only a line of colour or whatever, and do the same as before, colour part of lip in, blend with previous colour, now blue, then purple, then pink. Don't worry if your lines are smudgy on your lip line, that will be solved in a jiffy! If your lip line is squiffy, take the gold glitter liner and on the outside of your lips, so NOT ON THE COLOURS line the edge of your lips to make glittery goodness. After all "Glitter makes everything better"
Now you should be done I stress DON'T LICK YOUR LIPS it won't taste as good as it looks I regret to say and it will ruin the look, if you want to seal it for a big night out, carefully coat your lips in "lipcoat" and beware, the glitter is not tasty it is icky but not dangerous.